 [E]very year, I get a kick out of the parade of homemade Halloween treats in magazines, on websites and blog posts. From the most creative (cupcakes topped with “skeletons†made of yogurt pretzels and marshmallows) to the least (a full-sized fake plastic skeleton whose ribcage was merely loaded with sausages and other meaty snack “innardsâ€), it’s fun to see what new ghoulish goody interpretations people come up with.
 I generally shy away from the uber grisly looking snack concepts (like Jack o’lantern serving bowls “barfing†guacamole), although I love things like ice “hands†and “faces,†made with plastic gloves and masks, floating spookily in a punch bowl. And ever since the year I made owl cupcakes that used deconstructed Oreos as their eyes and horns (the process of which nearly drove me mad), I have resisted anything too labor-intensive that had little payoff.
Still, from time to time on Halloween, I like to toss my witch hat in the ring and attempt a spooky snack if an appealing recipe beckons. And a year ago, one did…in the form of a bloody severed finger!
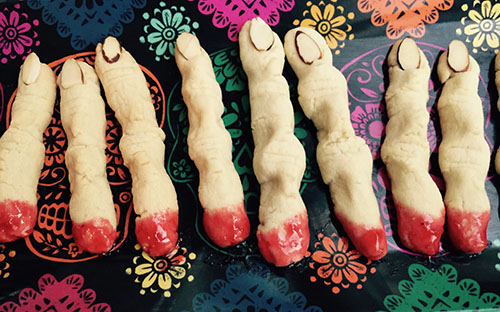
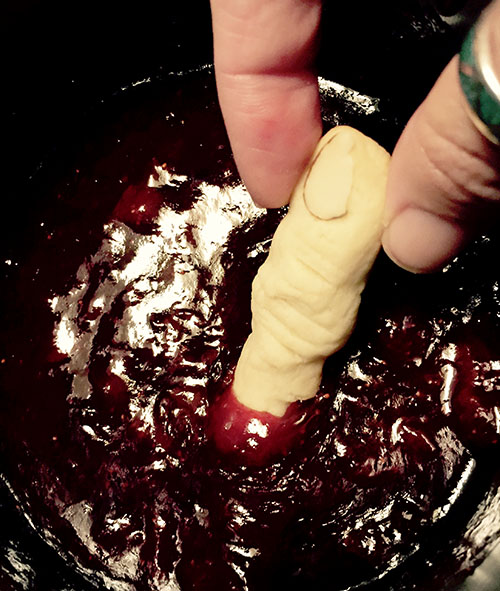
 I had seen online and on TV a couple of recipes for a sugar cookie dough molded into a craggy finger shape, complete with almond sliver nail, then once baked, dipped into some red (raspberry or strawberry) jam to resemble the bloody end of a chopped finger. Not only was the visual effective, the cookies also sounded delicious!
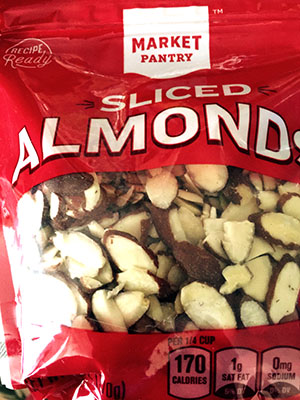
 The recipe I chose was featured on a kids’ Halloween episode of Food Network’s Giada De Laurentiis’ “Giada at Home.†The simple sugar cookie dough looked easily moldable (and I cannot resist a good sugar cookie dough for nibbling or finger-making). I decided to add a little almond extract in addition to the vanilla since the “nail†for each finger was to be an almond slice.
[M]y first go at baking these cookies was a year ago, for a Halloween/birthday/bonfire celebration in Kansas. It was a treat for me to make each finger, down to the wrinkle lines on the knobby joints of each bony digit.
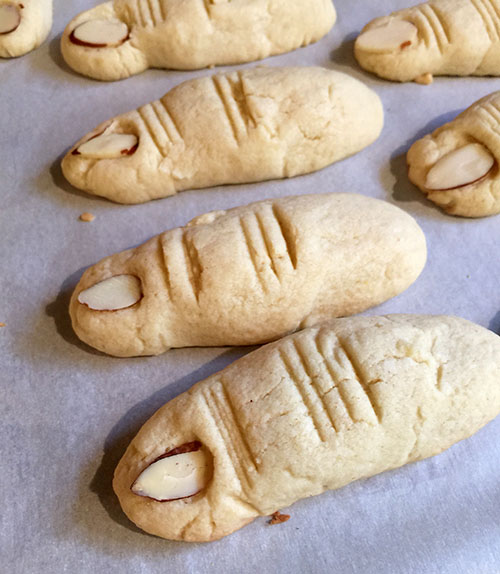 The cookies did puff up when baking (which kind of made them look creepier, in a bloated sort of way), but when I revisited the recipe this year, I tried chilling the dough, as well as making each finger a little thinner, to see if I could keep the fingers more bony and less fat.
I do think that my 2017 version of these beauties, both by chilling the dough and molding the cookies in a skinnier rendition, kept them from blowing up and spreading into stubby, fat fingers.
 Fat or skinny, the cookies are yummy, particularly with that little hit of sweet jam on the bottom. They are buttery, tender and flavorful and hold up well for several days, if kept refrigerated. My mom thought they were so delicious that they should be made year round, and suggested that they could be a sandwich or thumbprint cookie at less-ghoulish times of the year.
But while some might consider them to be in “poor taste,†I kind of prefer them in finger form. And I will always remember them as perhaps the first in a potentially burgeoning repertoire of what a friend called my “creepy but tasty pastries†I served at that Kansas party that also included chocolate mice.
BONE appetit!

Witch Finger Cookies
From “Giada at Home†(www.foodnetwork.com)
Makes 28 to 32 cookies
Vegetable oil cooking spray
2 cups all-purpose flourÂ
1/2 teaspoon baking powderÂ
1/4 teaspoon fine saltÂ
1/2 cup (1 stick) unsalted butter, at room temperatureÂ
1 cup sugarÂ
1 large egg, at room temperatureÂ
1 teaspoon pure vanilla extractÂ
28 large sliced almondsÂ
1/2 cup raspberry jamÂ
Place an oven rack in the center of the oven. Preheat the oven to 325 degrees F. Spray a rimmed baking sheet with vegetable oil cooking spray or line with a silicone baking mat. Set aside.
In a medium bowl, whisk together the flour, baking powder and salt. Set aside.
In the bowl of a stand mixer fitted with the paddle attachment, beat the butter and sugar together until light and fluffy, scraping down the sides of the bowl with a spatula as needed, about 2 to 3 minutes. Beat in the egg and vanilla until smooth. Gradually beat in the flour mixture until a dough forms.
Using about1 1/2 tablespoons of dough at a time, roll the dough between your palms into 5-inch-long fingers about 1/2-inch thick. Firmly press a sliced almond into the end of each finger to make fingernails. Make several horizontal cuts, about 1/4 inch deep and 1/2 inch long, in the center of each finger to make knuckles. Press the dough on either side of the cuts to shape the knuckles. Arrange the fingers on the prepared baking sheet and bake until light golden, 16 to 18 minutes. Transfer the fingers to a wire rack and cool completely.
In a small saucepan, heat the jam over low heat until warm, about 2 minutes. Dip the blunt ends of the fingers in the warm jam and arrange on a platter.

Blogger’s Note: I added 1/4 teaspoon almond extract to this recipe and chilled the dough about 30 minutes before molding. I used less dough per cookie — about 1 tablespoon. I baked the cookies on sheets lined with parchment paper rather than spraying a silicone mat.