[T]hough I’m not a traditional mom, I’ve had a number of charges in my care. Critters of all manner, wild and tame; I’ve rehabilitated a bird or two, watched over baby chicks, kept an ailing rabbit warm in my armpit. I’ve looked out for things for other people — the beloved miniature dachshund of two boys I babysat; on a bullet-ridden New Year’s Eve, I housesat a bungalow situated in South Central Los Angeles. I take my responsibilities very seriously, whatever they may be. So when I’m asked to take care of something I approach it as I do most things, with nervy apprehension. It’s a fun way to live.
So when my friend Elaine, a first-rate baker and cook, asked me to look out for her sourdough starter as she recovered from a surgery, I had the visions that come with responsibility. I saw myself letting her down and the sourdough starter, very much a live thing, curling up in its jar like a dried spider. But here’s the thing: if you get those worst-case scenario thoughts through your mind straight away, the likelihood is that there will be a far better outcome. Also, there was incentive in keeping the sourdough alive — I could use it to make bread.
I had a brief introduction to sourdough baking at a class taught at La Victoria Bakery in San Francisco. There, a small group of us gathered around an enormous wooden table to mix sourdough starter, wheat flour, salt and water, and work the dough into loaves we carried home to bake. Unfortunately, that experience was unfulfilled as I became ill that same evening and spent the next few days shivering and achy, a reaction from a tetanus and diphtheria booster. I had not attempted sourdough since, as I was a little…sour…from my memories of the experience.
 What other knowledge I had from sourdough starter was the remembrance of the ‘70s and ‘80s as a creature named “Herman†was passed around, fed, kept alive, died. The rural legend of an elderly woman in Kansas who, at the time of her death in her 90s, had managed to keep the same sourdough starter alive for all of her adult life.
Starter, essentially a flour and water mixture, becomes a live thing, as it develops a bacteria fermented and fed, used as a leavening in breads. Its history stretches back before history was recorded. It carries an aura of ritual and connection. It is passed down, passed along. For the modern cook, it can be made from scratch or come from various sources.
Elaine ordered her starter in a dry form from a small operation begun by a fellow in Oregon named Carl Griffiths, who had given sourdough starts to folks from a family cultivation kept alive for more than 150 years (Â for more info, go to http://carlsfriends.net/). That dried starter is activated by combining it with warm water, flour and sugar and allowing it to ferment for up to 48 hours. Elaine had had her current starter up and running for about a year.
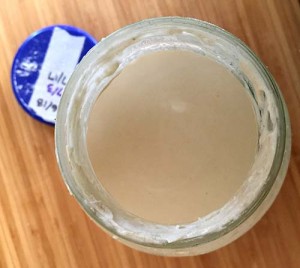
She brought me the cream-colored and slightly-thicker-than-cream textured starter cold from her own refrigerator, the dates of its feedings recorded in masking tape atop the quart-sized jar.
 “Does it have a name?†I asked. She laughed and shrugged her shoulders, “…Spike?†she offered. So, tentatively, I took Spike home. A name like Spike was good. It indicated this starter was already off to a sturdy start and would easily survive under the car and feeding of an anxious and unsteady baker.
Truth be told, the care and feeding of a starter is minimal. If you can remember and have the desire to keep said starter alive, you will! It is kept in the refrigerator, hopefully in a prominent enough position you will not forget it is there. Stirring the starter periodically is part of the care, as a clear-ish liquid forms on top. That is alcohol and needs to be stirred back down into the rest of the starter to keep it happy. Every two weeks, this starter is fed a meal of warm water or skim milk, flour and sugar and maybe occasionally some potato flour or flakes. A dose of vinegar from time to time is also said to perk up the mixture.
 Given that you are regularly adding to the starter, unless you have endless storage or endless friends with whom you can share it, the starter should be used for baking. Elaine, ever-thoughtful, provided me not only with recipes that came with the starter care directions, but even the cookbook that has her favorite sourdough bread recipe. In “The Bread Winners Cookbook
: More Than 200 Superior Bread Recipes and Their Remarkable Bakers,†by Mel London (1979), Elaine had affixed a Post-it note on a recipe for San Francisco Sourdough Loaves.
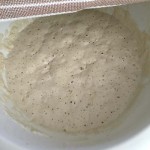
 On a day off when I knew I had time and proper attitude, I decided to try the recipe, opting to cut it in half (as the full recipe makes four loaves). To begin this recipe, you make a sponge using some of your starter, some four and warm water. If all goes according to plan, after several hours, it should be bigger and bubbly. Spike had inspired a lively beginning. sSo far, so good!
 Next yeast is activated in warm water with honey. The sponge, yeast mixture and flour and salt are then combined and on to the kneading. Mind you, I’ve always felt my kneading skills lacking, but put my full effort and arm into this 10-minute session. Despite my sweat on an 80-degree afternoon, I found pressing the warm fleshy dough with my hands one of my most satisfying experiences lately.

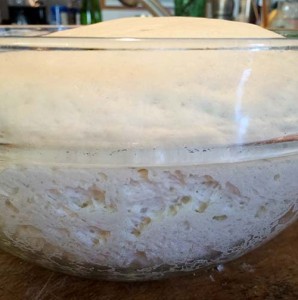
 The dough is put into a greased bowl for the first of two risings before shaping. It ballooned up voluminously and I felt sure all was right with the world. Bread-making can make you feel that.
 I did not have special French loaf pans to make the baguettes, so I did it freestyle, greasing a foiled sheet pan and dusting it with cornmeal so the loaves would not stick.
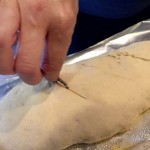
 The bread rose for the third time to plump, happy-looking loaves. I was extremely tentative, poised over the loaves with a new razor blade glinting in my fingers. I was to slash the top of the loaves, but London reassured in his book that these gashes would not cause the loaves to fall.
They did not. But at about the point I was happy and excited at my success in all these steps so far, I realized I had not gotten a spray bottle to spray the loaves with water, which ensures a nice crunchy crust. I improvised and dabbed the loaves with a wet paper towel, repeating the process halfway through the baking time
The golden loaves were delicious, a decidedly crisp crust surrounds a tender and finely textured interior. It reminded me of the warm breads tucked under blankets in baskets at seafood restaurants that could easily and satisfyingly be your entire meal. I savored that soft taste just tinged with the sour from my quiet new friend in the fridge in honor of my remarkable baker friend across the bridge.

San Francisco Sourdough Loaves
From “Bread Winners: More Than 200 Superior Bread Recipes and Their Remarkable Bakers†by Mel London (1979)
Makes 2 to 4 long loaves
The Sponge:
1 cup starter
2 cups unbleached white flour, unsifted (whole wheat flour may be used)
1 cup warm water
The Dough:
2 packages dry yeast
1 cup warm water
1 teaspoon honey
1 tablespoon salt (optional)
4 cups unbleached white flour (whole wheat flour may be used)
Sesame seeds for top
The night before you bake, mix the ingredients with a wooden spoons in a medium-size bowl. Cover lightly and place in a warm spot. This will be your sponge. The next morning, it should be bubbly and will have risen in the bowl. I generally tiptoe out of bed in the early morning, trying not to awaken m wife, and I lift the towel to look a the miracle that has occurred while I slept!
Next morning, make the dough.
Mix the yeast, warm water, and honey. Set aside to proof. In a large bowl, blend the sponge, the yeast mixture, salt, and the flour, 1 cup at a time. Turn out onto a lightly floured surface and knead for 8 to 10 minutes or until dough is smooth and elastic. I fyou find the dough sticky, add more flour.
Place dough in a greased bowl, turn once to coat the top, cover lightly and place in a warm spot to double in size (about 50 minutes to 1 hour).
Turn out onto a lightly floured surface, knead for 1 or 2 minutes and return to the greased bowl; cover and let rise again for about 45 minutes. The recipe calls for 3 rises, as you will notice. Actually, you can use only 2 rises, but I find that the bread has a finer texture when given the additional rise.
After the second rise, turn out again onto lightly floured surface, knead for 1 or 2 minutes and shape into 4 long loaves. Place in greased French-loaf pans sprinkled with white cornmeal (or use a cookie sheet treated in the same way), cover lightly and let rise to almost double (about 45 minutes).
Using a razor blade, slash the tops of the loaves diagonally about 2 inches apart. Don’t be afraid — the loaves won’t fall. Spray with water and sprinkle with the sesame seeds. Bake at 425 degrees for 25 to 30 minutes. About 15 minutes into the baking, spray the loaves with water again — this will give you a superb crust. Incidentally, I always use a hot brick in a pan of boiling water on the bottom of my oven.
When the bread tests done, cool on wire racks.
Blogger’s Note: I cut this recipe in half for two sizable loaves. I did not use the boiling water and brick in the oven.